Sunday, December 18, 2011

2011 HOLIDAY COUNT DOWN #18

Count down to 2012 - Our gift from FEST to you!

#18 ~ TODAY'S Tutorial By Runningwithescissors where you will find a large variety of splendid scrapbooking supplies to suit your fancy!
Today Barbar shares: Simple Holiday Candles

A quick trip to Ikea for some candles and I was off to play. I used 7 Gypsies Tissue but there's also some just out from Tim Holtz with musical notes on it that would be stunning too.
Tissue paper has little weight to it. Make sure your cuts are straight if you’re covering the whole candle as I did. I found using my big cutting surface and large straight edge, I got the best cut.

I held the paper to the candle with a very small amount of tape from a tape runner. Make sure your candle is parallel to the tissue paper, even the slightest angle will throw off your symmetry. Test before you tape and commit.

Start heating on one side of the seam and work your way around in 1 inch increments. Adhesion takes very little heat, keep the gun moving and smooth as you go. The very last thing I did was heat the bottom and top edges to make sure everything was adhered.

About $11.00 worth of material and I think I’ve got a smashing holiday gift for someone. Then again, it may never leave my mantle!

Saturday, December 17, 2011

2011 HOLIDAY COUNT DOWN # 17

Count down to 2012 - Our gift from FEST to you!
#17 ~ TODAY'S Tutorial By TheWoodenBee where you will find a fine collection of unique, handmade products that have been made from reclaimed materials with love!


Today Bee shares with us this delightful idea for wreath making!

Crafting with Nature


We select only the best shaped cones on our nature walks. Those that have not been broken and still have soft fuzz over them. Magnolia fruit cones hold up beautifully throughout the year, even when exposed to the elements. Our wreaths will be hung up during the holidays, and look just like they did last year when we made them.


You can even toss some cones in glass vases with holiday colored ribbons and are using them to help bring in the change of season!

Friday, December 16, 2011

2011 HOLIDAY COUNTDOWN #16

Count down to 2012 - Our gift from FEST to you!

#16 ~ TODAY'S Tutorial By TheQuirkySquirrel where you will find Gifts for knitters that are fun and quirky!

Today Terri shares with you how to make felted ropes!


If you would like more of these tutorials on felting please visit Felting Lessons!

Thursday, December 15, 2011

2011 Holiday Count Down # 15

Count down to 2012 - Our gift from FEST to you!

#15 ~ TODAY'S Tutorial By AquarianBath where you will find only the finest selection of soaps and natural herb products!
Today Cory shares: Easy Do It Your Self Soap Mold Making


Take apart wooden soap molds are great for making the perfectly shaped soaps, but they can be quite expensive. For 10 dollars or less you can make a soap mold yourself which is suitable for making professional quality soaps.

Here is what you will need to make a mold that will make 14-15 4.5 oz bar soaps to fit into standard soap boxes:

Sandpaper
Rotary saw
Power drill
1 natural board 3.5 inch wide X 1.5 inch thick X 27.5 inches or longer
1 natural board 5.5 inch wide X 1.5 inch thick X 35 inches or longer
2 six inch bolts with 1/4 inch diameter. The tip of the the bolt should be threaded at least an inch.
1/4 inch drill bit
4 1/4 inch washers
2 1/4 inch wing nuts


The first board forms the base of the mold and ends of the loaf. Measure and mark a length of the board 17.5 inches and 2 lengths 4.5 inches. The second board forms the sides of the mold. Measure and mark two lengths of the board to 17.5 inches. Cut and sand the rough edges of the boards. Next you will need to drill holes for the bolts that hold the mold together. Two bolt holes need to be made in two corners of the each board. Stack the 2 matching 17.5 inch boards on top of each other. Near one corner of the top board measure inward from the long side of the approximately 2 inches then measure from the short end 1 inch out. Mark this spot with a dot. Make a dot on the opposite end of the long side of the board. Drill the through these markings keeping both boards stacked securely together. Sand around the newly drilled holes. Next thread your bolt and washers and wing nut through the two boards. You are ready to assemble the mold. The narrow long board goes at the bottom in between the bolted side boards that secure it. The 2 short end boards stand up in between the sides of the board and are secured by the bolt which sits behind it. Be sure to line your soap with wax paper before use.


Cory Trusty is a community herbalist and Soap maker in Daytona Beach, Florida.
Visit her one Etsy at AquarianBath or DelicateAdornments. You can also find her on Facebook.

Wednesday, December 14, 2011

2011 HOLIDAY COUNT DOWN # 14

Count down to 2012 - Our gift from FEST to you!

#14 ~ TODAY'S Tutorial By SBB1 where you will find Handmade Clothing items and Accessories in American, European and Middle Eastern designs/styles as well as Pads and Wet Bags -


Today Sabina shares:Pre-Washing Your Fabrics before You Sew Them *VIDEO*

Tuesday, December 13, 2011

2011 HOLIDAY COUNT DOWN #13

Count down to 2012 - Our gift from FEST to you!

#13 ~ TODAY'S Tutorial By TheWoodenBee
where you will find a fine collection of unique, handmade products that have been made from reclaimed materials with love!

Today Bee shares: how to make this GORGEOUS holiday tree out of corks!

Materials:

__paper craft cone ( 11” or 14” height)
__wine corks (either synthetic, oak or both)
__strand of Christmas lights (battery operated or plug in)
__mini tree topper star
__hot glue gun

First, decide what size cone you would like to use for your tree. The number of wine corks available to you can help determine the size. When using the smaller 11”cones, you will need about 50 wine corks per tree. The larger 14” cones will take at least 100 wine corks. Once you have determined the size, you have some options on the material of the cone. We prefer the paper cone because it is the color of the wine corks, should you not cover every spec of surface with the wine corks. We also like the paper cone because it is hollow & allows you to hide the battery box so the lit tree can be put anywhere! The other cone material available is Styrofoam. Styrofoam cones allow you to easily pin the lights to the surface & are offered in much larger sizes should you have hundreds of corks to use. However, they are not as environmentally friendly as paper.
After, you have purchased your cone, put on your star topper & get ready for the lights. You can use white lights or colored lights. Most battery operated light strands have only 10-12 lights per strand & I would only use them for the smallest of the paper craft cones. If you are using the 14” cone for your tree, around 30 lights would be best. Remember to leave a little extra cord at the bottom, either to tuck under the cone or to reach the wall outlet. Start your light strand at the top, evenly wrapping the lights on the cone. With the paper cone you can use tape to hold the light strand in place as you wrap the lights (this also allows you to reposition them as you glue your corks if needed). I like to leave a little extra give when wrapping, so that when I am gluing the corks on I can move the lights to fit into place perfectly.

When your glue gun is hot & ready, start applying your wine corks at the bottom of the cone. Make sure to glue them so that you still keep a nice level surface for the tree to sit on. I start the corks at the bottom but then I jump to the top & then fill in the middle. There is no pattern, put the corks everywhere & anywhere as you are covering the surface of the cone. A second layer of wine corks will help cover any gaps or holes & the Christmas lights will stick out through the layered corks. I have even had to add a third layer to the base of the tree to help keep the tree shape. You will have to hold the corks in place for 20-30 seconds sometimes, especially when you are gluing cork to cork.
If you would like to add a little extra jazz to your wine cork Christmas tree, cut acrylic paint with blending gel (or water) & paint your wine corks before starting! Cutting or diluting the paint allows the designs on the wine corks to still show but adds a little color to the cork. I chose to dye only some of my oak wine corks on this tree…green & red wine to add the perfect Christmas colors. You can paint synthetic corks but I would only recommend the oak.

Please feel free to email, thewoodenbee@gmail.com, with any questions (& send pictures of your wine cork tree creations)! One of the things I liked about this craft, is it allows you some play & creativity so each tree is unique.
Our next crafting blog will be a magnolia cone wreath! Our daughter is thrilled to help with this, since she’s been collecting the magnolia cones on our nature walks all year long!

Happy Crafting!
~Bee

Monday, December 12, 2011

Happy Birthday To You!

Happy Birthday wishes going out to the following

Bohemienneivy on December 14
http://www.etsy.com/listing/86070520/emeraudes-et-opales-emerald-opal
Émeraudes et Opales emerald opal earrings vintage crystals marquise rhinestone jewels Christmas holiday glamour

Dkskinner also on December 14
http://www.etsy.com/listing/69200094/argyle-copper-cuff-bracelet-in-pink-and
Argyle Copper Cuff Bracelet in Pink and Reds

Justbecausebowtique also on December 14
http://www.etsy.com/listing/88439665/rodney-the-reindeer-felt-hair-clip
Rodney The Reindeer Felt Hair Clip Clippie - For Infant Toddler Girl


Eyyad or Eyadology on December 18
http://www.etsy.com/listing/71870092/fbml-custom-facebook-welcome-page
FBML Custom Facebook Welcome Page

Hope ya'll have a Wonderful Birthday!
ReneeBrownsDesigns


Sunday, December 11, 2011

2011 HOLIDAY COUNT DOWN #11

Count down to 2012 - Our gift from FEST to you!


#11 ~ TODAY'S Tutorial By AquarianBath where you will find only the finest selection of soaps and natural herb products!
Today Cory shares: How to make Herb Infused Oils


A herb infused oil is a base oil such as Extra Virgin Olive oil or Coconut oil that has been steeped with freshly wilted or dried herbs. Herb infused oils are fun to make and can be used for many purposes including culinary, for anointing, as body massage oils, for general skin care, or as a base for natural salve, lotion & balm remedies. Infused herbal oils are similar to essential oils in that they contain volatile oils from the herbs used to make the infusion, however the concentration of the volatile oils within an infused oil is significantly lower compared to essential oils. For this reason herb infused oils have a number of advantages for the average person compared to working with pure essential oils. First herb-infused oils are very safe, whereas working with essential oils is relatively dangerous and requires extreme care in regard to storage and dilution. There are many recipes in books and online for using essential oils, which are not particularly safe. Second, herbal infused oils can be made easily in the home with abundant herbs which can be harvested ethically, respectfully and sustainably in your local bioregion. For example, in Central Florida common plants like Southern Plantain, Elderflower, Pine.


There are a variety of methods for making herb infused oils, and each has its own advantage. They each have in common that fresh wilted or dried herbs are used to make the oil. Generally leaves, flowers, twigs or resins are used. The first method for preparing infused oils is the 'cold' method in which chopped herbs are added to a clean glass jar, filled with oil and left to steep in for a number of days. This method has it's advantage in that no external energy is required to make the oil, however with this method the chance of spoilage increases when using fresh herbs due to the residual water content in the plant material. Also infused oils cannot be made effectively using resins with this method. A second method is the crock pot method. This method is very convenient in that it is self contained, however much care must be taken to ensure that herbs are not overheated and burned. The third method, which I will present here, is the water bath (Bain Marie) or double boiler method. This is the method gives me the best results. Using a water bath herbs are heated slowly in a glass or ceramic container which sits within a larger container of hot water. This method is fast and convenient, there is little chance to overheat the herbs, and there is low likelihood of having residual water in the finished oil. It is important that the oil remains water free, because water-containing preparations are susceptible to bacterial growth.


Materials for Making Infused Oils by the Water Bath Method
~ Electric or gas burner
~ Freshly wilted wild harvested or home grown herbs OR dried wild harvested or organic herbs
~ Stable base oil (preferably organic) appropriate for either culinary or external use depending on your choice of herbs and your plan for the finished oil: Extra Virgin Olive oil, Coconut oil, Fractionated Coconut oil, Jojoba Wax, Sesame oil, Lard. Fractionated Coconut oil and Jojoba wax have an unlimited shelf life. When making body oils, persons with sensitive skin may wish to avoid coconut oil or use it at not more than 50% of your total oil solution.
~ Double boiler which can be made with a small pot and a Pyrex glass container, a mason jar, or other heat resistant glass or ceramic container. Use a glass container than you don't mind recycling if you are working with a resin.
~ Very clean utensils including: spoon or chopstick, knife, funnel, glass storage jar for finished oil, small plate, and cutting board for working with fresh plants.
~Cheese cloth
~Sharpie pen or sticker label & regular pen
~ Vitamin E
~ Pipette

Method
Clean and clear your workspace. Gather all necessary utensils and containers. Clean containers and utensils thoroughly in a dish washing machine or by hand with hot soapy water and a small amount of borax. You may also chose to sterilize utensils in the same way that one would do for canning. Another option is to wipe down utensils with high proof alcohol. Let containers and utensils air dry. Oil containers and utensils must remain free from water throughout the infusion making process.


Gather your herbs. If you are working with dry herbs, then organic or wild harvested are the best choice. Mountain Rose herbs is a good source for dry herbs. For fresh herbs, gather plant material with consideration to the ecosystem from properly identified specimens that are free from blemish and are at least 8 feet away from any roads. The best time to collect herbs is late morning when there is no dew or rainwater on the plant. Collect not more than 10 percent of a wild population of plants. Chop herbs coarsely and let them wilt in the shade for a few hours. Wilting herbs decreases the water content of the herbs.

Fill your clean jar or glass or ceramic container with herbs, then cover with the base oil of your choice. Coconut oil and Extra Virgin Olive oil are my personal favorites. I also use Sesame oil very often. Place your herb-oil container in your water bath and turn on heat to medium-high. Ideally you can cover your herb & oil container partially but not completely with a lid. Next let the herbs infuse in the oil for approximately 1-2 hours. The oil should get warm, but not so warm to burn the skin. You will need to monitor the oil and adjust the temperature. To check the temperature of the oil use your clean spoon or chopstick to drip oil onto your wrist. The oil should feel warmer than your body temperature but not so warm to burn the skin. After testing the temperature place your oily spoon on your clean plate. Be cautious throughout this step not to let water from your boiler to splash up into your herb and oil container. You will know when your oil is becoming ready when it has taken on the color & scent of the herbs. If you have used fresh herbs then you will want to steam off any excess water remaining in the oil before decanting. There are two good ways to check for lingering water in the infused oil when working with fresh herbs. First check the herbs with your spoon, they should have a crisp feel about them. Second, use your lid to completely cover the oil for a minute or two, then look under the lid for condensation. If there is condensation, then continue to infuse the oils with the lid partially covered so that water can steam out of the container. Check again until you are satisfied that the oil is water-free.

Next turn off the heat and remove the oil container from the water bath. Carefully dry the outside of the container and prepare to decant the oil. Place the clean funnel in your clean dry glass storage jar, and line the funnel with a couple of layers of cheese cloth. Pour the oil and spent herbs into the funnel and let strain. When the oil is strained completely, you can squeeze or press the cheesecloth to maximize your oil yield.

If you would like to make a double or triple infused oil then you can repeat steps 3 and 4 with this freshly infused batch of oil.

Double check your infused oil for water if you used fresh herbs. Let the jar of infused oil stand over night. Check the bottom of the jar for water droplets. If there is any water at the bottom of the jar, then you will want to pour the oil into a fresh jar, or pipette out the water droplets.

Storage and shelf life: Now you should have a fresh batch of infused oil that is clear with no remaining leaf or flower pieces. Oils, including infused oils go bad after a time because of oxidation. Rancid oils are oxidized and will have an off scent. To maximize the shelf life of your oils, put it in a container with a small amount of air overhead, keep it cool and dark. Add a small amount of Vitamin E to extend the shelf life of your infused oil.

Suggestions for Herb Infused Oils
Culinary: Oregano, Rosemary, Basil, Mint
General Skin Care: Calendula flowers, Mulberry (Morus alba) leaves, Elderflowers, Plantain leaves
Invigorating Massage oil: Mugwort leaves, Camphor resin, leaves or twigs, Lemongrass, Goldenrod flowers
Congested Chest Massage oil: Camphor resin, leaves or twigs, Lemongrass, Pine twigs & needles, Mint leaves
Anointing oil: Frankincense resin, Myrrh resin, White Sage leaves
Extra strength: double or triple infuse your herbal infused oil
Locally grown: What is growing in your back yard or neighborhood in abundance? Check out a field guide from your local library. There are many medicinal wild weeds, trees, and ornamental plants with culinary or medicinal value that would be great to experiment with.
Natural colorants: Annato seed (below), Alkanet root (see first blog image)


Article by Herbalist and Soap maker Cory Trusty in Daytona Beach. Cory's Etsy shops are AquarianBath and DelicateAdornments.

Copyright 2011 Cory Trusty aquarianbath.com. Permission is granted to copy, distribute and/or modify this document under the terms of the GNU Free Documentation License, Version 1.2 or any later version published by the Free Software Foundation;with no Invariant Sections, no Front-Cover Texts, and no Back-Cover http://www.gnu.org/copyleft/fdl.html

Saturday, December 10, 2011

FEST Happy Holidays Blog Giveaway

We are delighted to feature as our Happy Holidays Giveaway three colorful and fun polymer clay sculptures from Kathy of SmallThingsClay. Kathy creates fanciful clay sculptures of frogs, toads, lizards, crabs and all things whimsical from the sea and sand. She utilizes glass beads, colored wires, found shells and other items to produce unique and happy figures sure to bring a smile.

Kathy is providing a set of three of her wall hanging Nubibranches from her Epicenter Gene Pool Series as our December Giveaway, two of which are pictured. Each one of a kind Gene Pool is created with polymer clay, fired to specifications, painted in the best acrylics and sealed for UV protection. A swipe of a soft damp rag is all you need on cleaning day. They are durable enough to gift to a child and also perfect for adults.
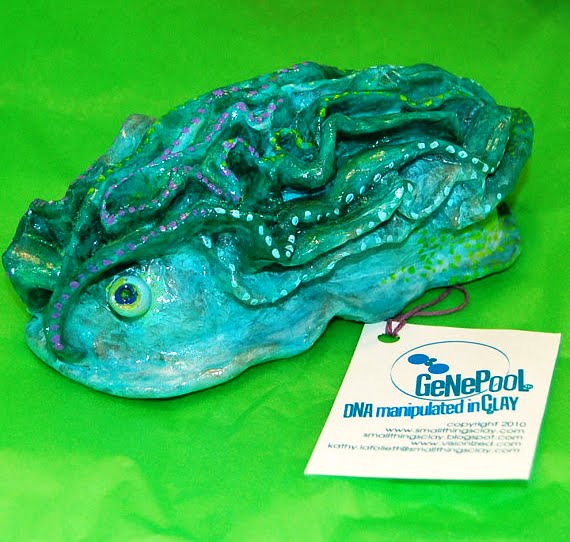
As a sponsor of the Florida Parrot Rescue, Kathy donates $5 to the FPR for every item she sells and helps in the effort to rescue, rehab and rehome Companion Birds throughout the State of Florida. Below is another of her creative figurines.


You can visit Kathy at her Etsy Store to see more of her clever creations at SmallThingsClay. HOW TO ENTER: Enter to win the Nubibranch Set by visiting SmallThingsClay or any of the FEST members listed on the top of our Blog Page. Find your favorite item, share it with us and tell us why you love it. Remember to add your email address or contact info so we can contact you if you are the Winner! Winner picked on 01/10/12. Simple and Easy!

2011 HOLIDAY COUNT DOWN #10

Count down to 2012 - Our gift from FEST to you!


#10 ~ TODAY'S Tutorial By RecreationalArt where you will find Unique Jewelry Creations and Vintage finds

Today Rose shares: Sweet Potato Pie Empanadas!
During the holidays I am all about simple, low cost, easy recipe's to fill in around the turkey and ham and all of those sides. If you have never used Goya's Empanada Disks
you do not know of ALL of the possibilities you are missing out on! I love love love these babies! You can find these in the frozen foods section, I have noticed a lot of grocers now have a GOYA section. I always have a package on hand because they can be filled with ANYTHING! you can make them salty, savory or sweet depending on what you have in your fridge!
A couple of years ago I had left over pumpkin pie filling and decided to try this out, everyone loved them so much now I make them every thanksgiving and Christmas to go with dinner!
I use a canned pumpkin pie filling (of course you can use sweet potato pie filling or even fresh!), some pumpkin pie spice to your liking and if the filling is not sweetened you can use a sweetener of some sort (I use agave), mix it all up and then fill each disk


then fold, crimp and bake~
when they are golden brown take them out, let cool a bit (the inside is hot). I wrap them in tin foil and keep warm until it's time to serve. SO easy!
...oh, and now you all have had an insight of how old skool my kitchen really is with that turquoise-teal color looking counter tops! yep. it's REALLY vintage!~ lols

Friday, December 9, 2011

2011 HOLIDAY COUNTDOWN #9

Count down to 2012 - Our gift from FEST to you!
#9 ~ TODAY'S Tutorial By TheQuirkySquirrel where you will find Gifts for knitters that are fun and quirky!


Today Terri from TheQuirkySquirrel shows you how to make felted rocks.


If you would like more of these tutorials on felting please visit Felting Lessons!

Thursday, December 8, 2011

2011 HOLIDAY COUNT DOWN # 8

Count down to 2012 - Our gift from FEST to you!


#8 ~ TODAY'S Tutorial By AquarianBath where you will find only the finest selection of soaps and natural herb products!
Today Cory shares: How to Make Fresh Herbal Boutineers and Corsages


You can make fresh herbal corsages or boutineers with Rosemary and other evergreen herbs and shrubs from your yard or neighborhood. Rosemary is one of my favorite herbs for the holidays, but these kinds of arrangements with other herbs as well. I've just been having fun with rosemary and red pepper.

You just need a few tools. You will need wire snips, florist tape and florist wire. You can get these from a craft store.


I choose herbs with fairly sturdy stems, but you can also use herbs with more delicate stems if you wrap them together with sturdy stemmed herbs. Strip the foliage from the bottom inch or 2 of the stem.


Poke a hole through the the green tender part of the herb stem and wrap the wire around the stem to stabilize it.


Stretch the tape and start wrapping it tightly at the base of the plant and continue down to the end of the wire.


Once you have the stems wraps you can combine them together however you wish. Finish by wrapping them all together with a new piece of florist tape. Here is a simple Rosemary and Hot Pepper boutineer.


You can also make and hanging ornament, a small wreath or corsage with additional herbs of your choice.

Tutorial by Cory Trusty, soap maker and herbalist in Daytona Beach, FL. Check out Cory on Etsy at AquarianBath and DelicateAdornments.

Wednesday, December 7, 2011

Team FEST November Lottery Winner


Congratulations to Sherry Spiers of Gemstone Isle on being the selected winner of the November Team FEST Lottery!

Sherry created beautiful handmade jewelry. She began her craft in June of 2010. Sherry loves to make jewelry and finds it very relaxing. She uses mostly semi-precious stones, crystal, and glass beads.

When asked about making her jewelry she describes her pieces as a reflection of her personal preference for jewelry that is feminine, not too big, and can be worn any time. She likes lots of sparkle too! Her design inspirations come from many sources, from everything in nature (flowers, trees, mountains, sky, the ocean) to a color or texture that strikes her fancy on a particular day. Her favorite piece listed at her shop right now is her lovely Dragonfly Charm and Mixed Purple Bead Pendant Necklace.

You can find her work both at her etsy shop and several local craft markets in the Tallahassee area. Stay tuned into her shop she will have a facebook page coming soon!

2011 HOLIDAY COUNT DOWN #7

Count down to 2012 - Our gift from FEST to you!


#7 ~ TODAY'S Tutorial By RecreationalArt where you will find Unique Jewelry Creations and Vintage finds


Today Rose: shares Sugar Coated Grapes!

Ok, this is an old one - but I find that sometimes I forget the old ones and get carried away with way too intricate recipes that they are teaching now a days! This is really a simple fun recipe that has more wow factor than you can handle, but better yet you can let the little ones do this one while you are working on dinner and let them feel like a part of the program!
These pictures were from Thanksgiving, hence the orange Sparkling Sugar For Baking - but with ALL the color choices now a days you can make these any time to color coordinate with your holiday or party theme! If you are going to do something like pink sugar it would probably be best to use a light green grape so that the color sparkles, I used the purple ones because I just thought with the orange coating they had more of a Harvest feel.....of course now that I see them here in these (poor quality) foto's (yes, I used my cell phone) they kind of look like they would have been PERFECT for my Halloween party!
A few simple ingredients and you can have a great appetizer or a dessert to go with fruit. You will need a tiny amount of Light Corn Syrup - and believe me when I say a little bit goes a very long way! just keep rolling your pre-washed grapes in the corn syrup until they are all coated.
(ok, I let my grandson roll up his sleeves and get in there with his hands and feel all the ooey goeyness of it!)
then you put your choice of colored sprinkles in a bowl and you roll your grapes in it!

and voila!~ it's that easy. Keep them in the refrigerator until you are ready to present them to your awed guests!
