Sunday, June 26, 2011

Greetings From On Board The SS Tesla: 06/26/11

Hello Team FESTers!

I apologize for the lack of posts last week. I am getting ready to go back to school very soon and my hands have been very tied for the last month or so. Keeping that in mind, this will be a short post today. Today's do it yourself is brought to by Gothic Beauty Magazine:
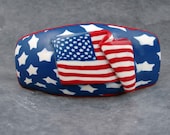

Tarot Card Tote Bag

Font size: Decrease font Enlarge font
imageIf you enjoy fortune telling, or even just the artwork, you can easily amass more decks than you know what to do with.
Tarot cards come in so many varieties these days, just like everything else in the era of personalization. Rather than letting your less used cards collect dust, you can turn them into a unique fashion accessory.
Supplies: Empty cereal box, Colored duct tape, Tarot cards, Scissors, Ribbon, Mod Podge & paint brush, Eyelet kit (including hammer & solid surface to hammer on).
Starting with the empty cereal box, first cut down the middle of one of the long side panels. You can completely remove the panel if your cut gets too messy, but folding the excess cardboard down around the inside edges will add extra stability. Tape those edge flaps down, and then use more tape to reconnect the top panels of the cereal box, where it was originally opened to pour the cereal out.
The next step takes a little time and patience, so you may want to pop something entertaining on in the background. You need to cover every inch of the box, inside and out, with the colored duct tape of your choice. It might seem tedious, but it serves two important functions. Not only will it add durability — which is important when working with such thin cardboard — but it also gives you a blank canvas to work with. If there are any gaps between the tarot cards, intended or otherwise, a nice solid color will show through rather than cereal logos and nutrition information.
Once the box is totally covered, test a few ways to arrange the tarot cards as decoration for the box. You can overlap cards to completely wallpaper the box, or arrange them as distinct cards that tell a specific fortune. You can use the art on the back of the cards or the front, cover the sides or inside of the box, or even cut out shapes from the cards to use. Just make sure you're happy with your design before you even open the glue.
Tarot tote bag
Depending on where you're working, you may want to cover your work surface for the next step. Use the Mod Podge to glue the cards in place as you arranged them. For the best stick, coat both the back of the card and the surface of the box. It dries clear, so don't worry if you can see some excess around the edges of your cards. Depending on how your cards are arranged, you may have to hold them in place while the Mod Podge dries. Time between coats averages about twenty minutes, so again, plan something to occupy you during the hands-on downtime. When everything is dry, put a top coat of Mod Podge over the entire exterior of the purse. This will keep rain from damaging the artwork, and it also adds yet another layer of reinforcement. If you want to add more decoration, you can build up little peaks of Mod Podge to accentuate details in the art, or you can use glossy Mod Podge to give the whole thing a bit of shimmer.
After everything is completely dry, get out the eyelet kit. Use the scissors to poke two evenly spaced holes on the front and back of the box, near the lip. This is where the handles will be threaded through, and the exact positioning will vary depending on where all the cards are placed. The holes should be just big enough to accommodate an eyelet. Place an eyelet in one of the holes, finished side facing outward. Position your hard surface under the unfinished side of the eyelet, which should be inside the box. Due to the box shape, a counter corner is ideal. Put half of the eyelet tool between the hard surface and the eyelet, and the other half between the eyelet and where the hammer will be. Strike the tool with the hammer a few times, and the back of the eyelet should split and spread, securing it in place. Repeat with the other three holes.
tarot tote3.jpg
Use your body to measure a length of ribbon for the handle. If you want a long handle, run the ribbon over your shoulder and back down to the level you want the purse to rest at. Or drape some ribbon over your palm to measure out a smaller handle. Use your first cut of ribbon to measure an identical second length. Finally, simply thread the ribbon through the eyelets and tie a knot on each end, on the inside of the purse, to keep it from popping back out.
Now you have a tote bag that not only looks one-of-a-kind, but is made to fit your unique measurements too. (Photos by Billy Crum)

Check out the magazine, they have so many wonderful craft ideas for everyone!

Good Luck and Godspeed
xoxo,

Capt. Maricruz

Tuesday, June 7, 2011

Interview with Aspiring Images - Winner of the April Team Challenge

Meet Rachel of Aspiring Images

Who are you?
Greetings! My name is Rachel Abrahams, of the Etsy shop Aspiring Images by Rachel. I have a day job but in my off time I follow my creative obsession: photography. I am married and we own two dogs, a Otis (the Pug) & Pac (the Great Dane) - we call them the odd couple. They are both so funny and sweet.

How did you come about your Etsy store name?
I wanted something that was different than the typical [Insert Name] Photography. I listed several words I felt were positive & inspiring and using the Thesaurus eventually landed upon the word “Aspire”, adjusted it, and tacked it to Aspiring Images by Rachel. This, along with several other names, was voted on by my friends and family and Aspiring Images by Rachel was the definite front runner. I feel that for all artists we are constantly striving to get better at what we love to do. We have our aspirations and goals and I felt this was perfect to epitomize my journey I am taking to develop my photography skills in, what I like to call, my photography adventures.

Where does your inspiration come from?
Everywhere I look, I constantly am framing images in my mind and wondering “with this light/composition/location could I get a really amazing picture?” It’s something I’ve done for as long as I can remember. It kills me when I see something that I know would be an amazing shot and I can’t get it either because I don’t have my camera with me or it’s in a location I can’t quite get to.

How would you describe your creative process?
Honestly, I tend to be an all or nothing kind of gal. I will go through these, somewhat obsessive, bursts of inspiration and then it will cool off for a bit. Hot and cold. When I am being obsessive, I refer to my list I keep of places/things I would like to photograph and decide “I am going to shoot that tonight/tomorrow/this weekend” and then it’s all I can think about. I start planning it, looking up tips online, try to predict lighting & weather, what I will need, and then just go for it. Sometimes I come back with amazing stuff and other times, it’s more like “Eh, it’s ok”. Either way, I learn from it and that is the best part of it all.
Most of my time isn’t spent in the field shooting but actually on my computer backing up my files, editing, and organizing them. This can be very draining but it’s a necessary evil in order to ensure nothing is lost. That motivates me to make sure it is done correctly.
I am trying to teach myself to be more consistent and just keep plucking at it but that’s not easy for my true nature. When I am not feeling very inspired to find something to shoot I now fill that time with learning more about the technical aspects of photography & Photoshop. I also love using my RSS Reader and looking at the blogs of other folks who do amazing photography as well as the community I’ve created on Flickr. The inspiration there is endless.

When did you know you were an artist?
Me? An artist? That idea still amazes me. Growing up, I was super creative in everything, especially performing arts, but I never considered myself an “artist”. The idea of getting into photography was never obvious to me but everyone around me always tells me they knew someday this would be my “thing” because I was ALWAYS taking pictures of our events, activities, hanging out, etc. It made me so happy to share those photos with people but they weren’t really for a creative purpose. When I was doing study abroad in London, it hit me I wanted to take these amazing pictures but didn’t have the technical skill I needed sometimes. I still tried and came home with some beautiful pictures. It was then that I knew this was my true creative calling and I was now actively seeking to learn more about photography.
What do you enjoy "window shopping" on Etsy on your free time?
I can’t resist “window shopping” jewelry, especially earrings. There are such beautiful pieces on Etsy and I think my favorites list is 90% jewelry. It’s amazing the things that are on Etsy and I am so appreciative of how hard people work to create unique & beautiful items. There is something for everyone on Etsy, for sure.

What other interests do you have?
I absolutely LOVE to read. I read a ton of books, subscribe to multiple magazines, and always have way more blogs to read than I can possibly finish. We live near Disney and have year-round passes, so I am there as often as possible and it’s wonderful because there’s no pressure to do every single little thing because we know we can come back anytime we please. I like to make sure I have myself surrounded by inspirational music, food, books, podcasts, etc, so that every single day I am learning something new. The idea of settling in and saying “Ho Hum. My world is what’s on TV’s Primetime, my news is whatever the local channel tells me is important, & my food comes from the chain that sells that bland everything everyone likes” just kills me. If there’s a day that goes by where I haven’t discovered something new about this world, I feel I haven’t lived up to my own standards – and those standards are pretty darn high. Gotta keep things interesting, ya know?

What are some other sites to find out more about you and your art?
Blog: AspiringImagesbyRachel.blogspot.com
Facebook: www.facebook.com/AspiringImagesbyRachel
Twitter: www.twitter.com/AspiringImages

What would be the title of your memoir? Why?“The Fantastical Adventures of a Funky Foreign Kid”
So, let me explain. In regards to the “Funky Foreign Kid”, I grew up living in the Middle East for most of the 80’s, so I always like to joke I missed the 80’s and am now trying to make up for it by listening to the music non-stop. Because of this, it always provides loads of entertainment to my friends when they discover I don’t know what a certain phrase means, never have seen a popular TV show/movie, or when I describe what was normal in MY childhood and it’s nowhere near what kids in the US encountered while growing up. As a result, I was nicknamed “Foreign Kid” or “Fez” (from That 70’s Show). For “The Fantastical Adventures” that definitely references one of my friends’ favorite pastimes, which is listening to a “Rachel Story”. Inevitably, it’s some crazy/wacky story of something that happened to me and it is never fails to be hilarious/crazy/unbelievable and provides loads of entertainment. What can I say, I seem to have a weirdo magnet attached to me. I love it though because my life is definitely an adventure – even for something as simple as grocery shopping!

Sunday, June 5, 2011

Greetings From On Board The SS Tesla 06/05/11

Hello Fellow Team FESTers!

I hope Memorial Day Weekend was wonderful for all of you and I am here to give you an update on a few art shows coming up that some of you FESTers may be interested in attending for the South Florida FESTers:

The Art of The Jedi Art Nouveau Show  June 22nd - There may be some spots open but it's best to contact Teresa Korber

The DaDa Bazaar Early July - Submissions for vendors are open now for this one. Contact Allison Kapner or kappy6@yahoo.com to be a part of July's event.

Stitch Rock October 1st- Vendor Submissions are still open as far as I know at this time, but I believe they will be closing the submissions very soon so I would get in on it. It's one of the biggest craft shows of the year in the South Florida area.

That is all for now. I will try to get some more info as time goes by and as I gather more information.

So with that I will leave you with another fun crochet video brought to you by the lovely 81aprilmoon1 (this video tutorial is going to be in several parts). This goes along with the Star Wars Art Show:

Part 1:


Part 2:


Part 3:


Part 4:


Part 5:


Part 6:


Part 7:


Part 8:


Part 9:


Hopefully #10 should be coming very soon!

-Good Luck and Godspeed,

xoxo,
Capt. Maricruz


Thursday, June 2, 2011

Get Ready for the JUNE FEST Blog GIVEAWAY

Our lucky June Winner will have an opportunity to select one item from either of Carrie's Shops - HappyLittleMonkey or MonkeySeeMonkeyDo. Carrie is a Florida native now living in Tallahassee. She creates wonderful products for kids with practicality, utility and parents in mind.

HappyLittleMonkey specializes in great baby gifts and you can choose a Premium Swaddling Blanket and Burp Cloth Set from this Shop similar to this lovely blue, aqua and white blanket combo as your Giveaway.


MonkeySeeMonkeyDo features items for bigger kids, from age 1 to around kindergarten and growing. Or select as your Giveaway, an Appliqued Shirt from this Shop. Here's an example of Carrie's special designs.


Carrie spends hours searching for just the perfect materials and fabrics for her fabulous creations and, in addition to the Giveaway, if Team FEST members purchase a Swaddling Blanket Set by July 4th, Carrie will monogram the blanket or burp cloth FREE when FEST members use the code GOTEAMFEST in the comments.

HOW TO ENTER: Enter to win by visiting Carrie at either or both of her Shops HappyLittleMonkey or MonkeySeeMonkeyDo or any of the FEST Team members listed in the Member Section. Find your favorite item, share it with us and tell us why you love it. Remember to add your email address so we can contact you if you are the Winner! Winner picked on 07/04/11. Simple and Easy!